Showing posts with label Halloween. Show all posts

Friday, October 31, 2014

Fun Friday: DIY Zombie Costume

What happens when your kids get sick & you neglect to buy Halloween costumes? You make your own of course! But with less than two hours until trick-or-treat, your options are a bit limited (I don't care how many "quick & easy" costumes you saw on Pinterest). So you make due with what you've got.


Of course some white face paint, smeared eyeliner, fake liquid blood & crazy teased hair will complete the look. But if you don't have it, you can still rock it like you just stepped into the zombie apocalypse.

What You'll Need

•old clothes
•permanent marker
•scissors
•lighter

How To

•Start by having whoever is going to be the zombie, put the old clothes on. 
•Next, take the permanent marker & make quick marks where you plan on cutting. Doing this will help make sure that you don't end up leaving the zombie too exposed before going on a cutting spree.
•Have the zombie take off the old clothes & then start cutting on top of the permanent marker. 
•For a more zombie-like vibe, tear the cuts to distress the fabric a bit more. If you have a cotton shirt, you can take a lighter to it for a few seconds before extinguishing the singed parts by patting on them. (See below.) Be sure you do this step by a sink, just in case patting doesn't work & you need to submerge the clothing in water. 


Just don't forget the zombie walk!

Thursday, October 30, 2014

Think It Thursday: Why I Love Halloween


In case you haven't figured it out yet, I love Halloween! It is by far my absolute favorite time of year. 

Here's why...

•Pumpkins - Not only can you eat anything & everything pumpkin flavored, but you can carve them, paint them & glitter them. 

•Scary movies - OK, so I may not be able to watch them as much as I want, but I still do get a few good ones in every year. Tonight after the kids go to bed, The Shining! 

•Decorations - There's just something about witches, goblins & vampires that makes me go all giddy. 

•Festive food - I'm talking meatloaf hands, brain cupcakes, spaghetti intestines & worms! 

•Trick or Treat - Trick or Treat, smell my feet, give me something good to eat! I absolutely love taking my kids through the neighborhood to go trick or treating. And I may volunteer to do it for my youngest when she gets too tired to do it herself. 

•Dressing Up - OK, so I may not dress up anymore, but I love getting my kids all ready. Not to mention checking out everyone else's costumes. 

What do you love about Halloween?


Sunday, October 26, 2014

Simple Sunday: Spooky Read


I read this book every year! Someday, I'll make it to some of the places mentioned in it. 

Have you ever been ghost hunting? 

Saturday, October 25, 2014

Fun Friday: Cardstock Bats

When it comes to decorating for Halloween, I find myself giving each room it's own theme. Dracula always ends up in my bathroom, witches congregate in my kitchen, ghosts mingle in the living room & well, you get the point. But I've always wanted to find something to tie them all together. 


These Cardstock Bats are now flying all over my house! 

How To:
 
•Take a piece of black cardstock (mine was 12x12in.) & fold it in half diagonally (doing this will give you a bigger wingspan).
•With a pencil, draw out half of your bat shape. I did mine freehand, but you can always Google a template to use. 
•Cut out your bat & lay it out flat. 
•On the back fold, apply three bits of folded tape & adhere it to the wall. 
•For a three dimensional look, carefully fold the wings outward. 

Friday, October 17, 2014

Fun Friday: Fancy Glittered Pumpkins

We always decorate pumpkins at our house. But this year, I wanted to decorate my pumpkin a bit more grown-up-like. So I busted out the Elmer's glue & glitter! I know what you're thinking, but trust me, this Fancy Glittered Pumpkin definitely looks grown-up (not to mention it took a few grown-up skills).


I opted to keep this one pretty simple since I wasn't sure how it would turn out. (The next one, I'm painting the pumpkin & the stem beforehand.) But I've got to admit that it doesn't look too shabby. Shabby chic, maybe, but shabby, no. 

What You'll Need

•pumpkin (make sure it's clean)
•Sharpie marker (or any other permanent marker)
•Elmer's glue
•clean paint brush
•glitter
•newspaper or other surface to work on
•small cup of water
•paper towels or old rag

How To

•Start by setting up your work area so that everything you need is in arm's reach (once you get started with the glue, you'll have to work quickly).
•With the Sharpie marker, draw your design on the pumpkin. 
•Working one small section at a time, carefully trace over the marker with the glue. If the glue gets too out of hand, carefully clean it up with the paintbrush as best as you can before covering it in glitter. 
•Occasionally go back to check for running glue & clean it up, sprinkling more glitter if needed. 
•When all sections have been glittered & the glue no longer has a risk of running, take the pumpkin outside to blow off the excess glitter. 
•Allow the glue to thoroughly dry. 


Friday, October 10, 2014

Fun Friday: Spooky Paper Trees

Whenever a holiday rolls around, I always end up making some sort of decoration, which means that the kids usually do too. And I have to say, that not only did their Spooky Paper Trees turn out awesome, but they really had fun making them too.


All you need is a small paper bag, 1/2C. of rice or popcorn kernels, a small rubber band, scissors & a lot of creativity. 

We decided to cut the tops of the bags in strips (we used the bottom folded part as our guideline), before filling the bottom with popcorn kernels & sealing it off with a rubber band. 

Next was the fun part! The kids had to twist & fold the strips into "branches". I should probably tell you that it's a bit harder than it sounds since we didn't use any pipe cleaners to help us out (although you certainly could if you wanted to). And as a spooky finishing touch, I cut out a little black crow (at least that's what it's supposed to be), to sit on a branch.
 

Thursday, October 31, 2013

Think It Thursday: Happy Halloween!

It's finally here!!!! 

I have had one busy day today! Family Involvement Day at the preschool (I got a whole 2 pictures during all the chaos...neither of which turned out the greatest), a Halloween inspired lunch (the kids ate it before I could get a picture), tons of Halloween movies....but no Trick or Treat. Due to the weather it has been rescheduled for Sunday (perfect for our Simple Sunday blog post!) so I have no pictures to share. And now I have 7 huge bags of candy in my cupboard until Sunday...hope they last!

So since I have no pictures of my own, I thought I'd share one that sums up a perfect Halloween night for me.


Have a spooktacular Halloween evening friends!

Wednesday, October 30, 2013

Work It Wednesday: Zombie Nails by Star Focal

How would a zombie 'work it' on Halloween?


With some Zombie Nails of course! 

I am just in awe of how amazing these look! So while you go check out the tutorial, I'll just be sure to thank Star Focal for allowing me to share this with you....THANK YOU! (Said in my best undead voice.)

A Special Halloween Feast!

In case you haven't noticed, I love Halloween. I also love to cook & bake. So what happens when the two collide? A special Halloween feast!

Raw flesh so to speak...

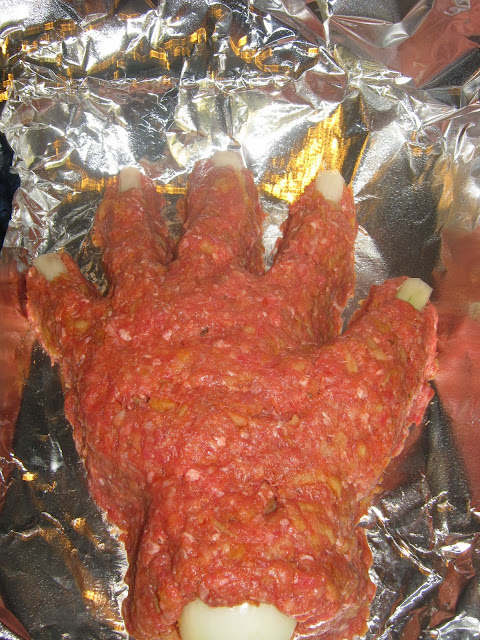
First course my Zombie Hand Meatloaf! Or monster hand, depending on which monstrosity you prefer. This goes excellent with Spaghetti Intestines & Cauliflower Brains.

Spooky!


Next up, dessert, courtesy of Lagniappe! Turn on the black light & pass the Glow in the Dark Cookies around. Yes, they really do glow & no, you won't turn into a mutant of some sorts from eating them. At least I don't think so...

Ethan, a.k.a. Batman & his pumpkin!

Just in case you do turn into some creature of the night, Batman is there to help! Well, at least this Batman Pumpkin from Yvettes Creations is. Make sure you save the seeds to roast, they make a great little accompaniment to a special Halloween feast.

Enjoy!

If you dare...

Sunday, October 27, 2013

Simple Sunday: Jack-O'Lantern


Forget using a stencil & making cartoon intricate designs! The kids & I took the classic approach with this pumpkin. Everybody, meet Jack, the Jack-O'Lantern!

Friday, October 25, 2013

Fun Friday: Toilet Paper Pumpkins

After my Toilet Paper Mummy last week, I figured a pumpkin would be pretty easy to pull off too.


I happened to have some black silky material & some cream colored fabric in my craft stash. Perfect! I just laid the fabric flat, set the toilet paper roll in the middle, pulled the fabric in & tucked it into the roll. I did happen to pull the fabric out just a bit so that it didn't look like a roll of toilet paper wrapped in fabric. (I'm giving them a complex, I know.) The black one has a piece of unrolled raffia for the stem & the cream one has a piece that fell off of a Thanksgiving pumpkin decoration years ago. (Now that I actually have it out I might fix it this year.) 

And of course I have these pumpkins conveniently placed...on the back of the toilet. 

Friday, October 18, 2013

Fun Friday: Toilet Paper Mummy

So I stocked up on toilet paper recently, only to realize that I didn't have room to store all of the rolls. Then the idea came to "decorate" them for the time being & keep them out as part of my Halloween decor. 


I just wrapped it in cheesecloth, tucking the ends into the opening of the roll, then glued on some googly eyes with a dab of Elmer's glue. Simple as that!

Thursday, October 17, 2013

Think It Thursday: Getting Ready For Halloween


I seriously love Halloween. 

I'm still in the midst of decorating (mostly because I keep making things), but we are in full blown Halloween mode here. The trick-or-treat route is in final planning stages, other parties & festivities have been RSVP'd & my creepy Halloween dinner is starting to come together. There's still pumpkins to be carved, costumes to be fitted & school treats to be made. The kids Halloween movies have all been pulled out to watch as well as books to be read. 

In case you couldn't tell, I really do love Halloween. It's such a fun time of year for the whole family to enjoy! 

Friday, October 11, 2013

Fun Friday: Double Double Toil & Trouble


I have decided to make my kitchen a witch theme for Halloween. But of course it wouldn't be complete (even though I'm far from done) without this canvas I painted tonight.

Friday, October 4, 2013

Fun Friday: Hand Painted Halloween Figures

I love to paint! But not just anything, I love to paint plaster. My Christmas tree is almost entirely covered by ornaments I painted. I have a little Christmas Village too (which, come to think of it, I need to finish that). But my Halloween figures have to be my favorite.


Dracula didn't quite make it through storage.

The newspaper my poor Dracula was wrapped in got something on it & decided it would try to make him a Mummy instead. I was a bit bummed at first when I saw him, but then I got excited knowing that I would be able to get all of my paints out to fix him. I may even get that Christmas Village done in time to set up in a couple months.

Friday, September 27, 2013

Fun Friday: Chalkboard Paint Pumpkins


I know it doesn't look like much, but those painted black pumpkins are actually painted with chalkboard paint. (And yes, it's still a bit wet.)
 
I picked our Jack Be Littles from our garden & decided to paint the largest three with chalkboard paint. This way, the kids can "paint" their pumpkins a different way every day.

Wednesday, October 31, 2012

Halloween Dinner...Zombie Style!

What do you get when you take a love of cooking & add a little twist of Halloween? Zombies. Not literally of course, just their dinner.

Appendage anyone?

So, on one of my many times perusing Pinterest, I came across a meatloaf hand. It was made with a mold & had some recipes. At least I think it did, I was fixated on the hand. Complete with fingernails & an exposed bone at the wrist. So I figured, how hard could it be?

I took a family favorite meatloaf recipe & molded it carefully into a hand shape on foil sprayed with cooking spray. (Easier to transfer & drain the grease that way.) Next, I tucked in some onion pieces for the fingernails & the rest of the small onion into a hole I made at the "wrist".


This is what it turned out as. Although I have to admit it looked more zombie-like raw. Now it looks more monster-ish.


Middle & ring fingers with Spaghetti Intestines (spaghetti & marinara) & Cauliflower Brains (huge chunks of fresh cooked cauliflower). My meal was complete. Although I couldn't help but think of Indiana Jones & the Temple of Doom while I was eating my "brains".

So, about that meatloaf recipe. Mine is a slight variation of French's Crunchy Onion Meatloaf.

Zesty Onion Meatloaf

1-1/2 lbs. ground beef
1-2/3 C. fried onions (I prefer the cheddar ones)
1 C. marinara (Newman's Own makes a great one)
2 Tbsp. Worcestershire sauce
1 egg
salt & pepper

Thoroughly mix beef, 1 C. fried onions, 1/3 C. marinara, egg, Worcestershire, salt & pepper. Shape into loaf in a shallow baking dish. Bake at 350 degrees for 1 hr. or until meatloaf is done. Drain fat. Spoon remaining marinara over meatloaf & top with remaining fried onions. Make 5-10 min. longer, or until onions are golden.

Enjoy!
&
Happy Halloween!